Keeping your car in good condition is important for ensuring it runs smoothly and keeps you safe on the road. One part of this process involves understanding and replacing car hoses, which can be difficult to navigate without proper knowledge.
This comprehensive guide will outline everything you need to know about car hoses, from how they work to when they should be replaced – so that you can keep your vehicle running at its best.
Types of Hoses Used in Automobiles

Source: hoseshop.net
When it comes to cars, hoses are an essential component. There are different types of hoses used in automobiles, each suited for a specific purpose. Radiator hoses transport coolant from the radiator to the engine block and back again, ensuring that your engine stays at the proper temperature.
Heater core hoses provide hot fluid to your heater core so you can stay warm on cold days. Vacuum hoses direct air into certain areas of the engine that require more airflow than others. Fuel lines carry fuel from the tank to the carburetor or fuel injector, allowing gasoline-powered engines to run properly.
Brake lines transfer brake fluid from one part of the system to another while keeping it under pressure so brakes work as they should. Finally, the power steering hose helps make driving easier by transferring power steering fluid throughout your vehicle’s system when you turn its wheel left and right; this allows you easier control over how your car moves in any direction desired
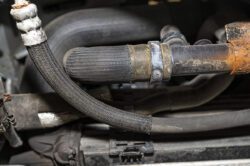
Identifying and Locating Failing or Damaged Hoses

Source: mechanicbase.com
Identifying and locating car hoses that are either failing or damaged is a key step in understanding and replacing them. It is important to know the type of house you have, where it is located, and what symptoms to look out for.
Failing or damaged hoses can be identified by several signs such as corroded fittings, bulging areas in the rubber part of the hose, softening around bends or kinks that may indicate a break inside, excessive heat along its length (due to friction), vibration while driving due to an obstruction within the line, leakage from any part of the hose assembly (including clamps) or cracks on its surface.
Locating these failing hoses often requires opening up various parts of your vehicle’s engine bay including hoods and radiator covers so that all components can be visualized. Knowing exactly what type of car hose you have will help determine whether replacement parts should be ordered from a manufacturer or if more complex repairs are needed.
Finally, once all necessary information has been gathered about each failed/damaged component then it’s time to understand how best to go about replacing them correctly so that no further damage occurs down the road.
Tools Needed for Replacing Car Hoses
Replacing car hoses requires some basic tools to ensure the job is done correctly. You’ll need a set of wrenches, which come in different sizes and lengths depending on the size of the nuts and bolts you will be working with.
A socket wrench is also handy as it can provide numerous sockets that are needed to loosen or tighten certain components. A screwdriver should also be part of your toolkit so you can remove screws from housings or connectors if necessary.
Additionally, a pair of pliers might be required to grab hold of any stubborn fittings or clamps that refuse to move when using other tools. Finally, the sealant may be needed depending on what type of hose material is being used so make sure you have some on hand before beginning the project.
Step-by-Step Guide to Replacement Process
Replacing car hoses can seem intimidating, but with this step-by-step guide, you’ll be able to tackle the task in no time.
- Familiarize yourself with the hose and its purpose. Make sure that it is indeed the right part for your vehicle before beginning any work.
- Purchase a replacement hose of identical size and shape as the one being replaced.
- Locate the old hose on your car and make note of any nuts or bolts that may need to be removed to replace it.
- Remove all necessary components from your car so that you have access to where the old hose needs to be taken out.
- Disconnecting or cutting off the old hose at both ends if necessary then take it out completely from its location on your vehicle–be sure not to throw away any parts as they may come in useful later!
- Install new hose by connecting it at each end per manufacturer instructions then put it back into place on your vehicle; reattach all necessary components if needed along the way
- Finally, double-check everything was done correctly – ensuring there are no leaks before taking the car for a test drive!


